How to Draw Demon Slayer
There are countless special ideas regarding manga and anime, many of which are truly cool and fascinating. The arrangement for the Demon Slayer series is no special case. This series follows youngster Tanjiro Kamado who turns into a Demon slayer after an assault by a Demon variant of his sister that costs him his loved ones. An activity-stuffed and sharp series has numerous extraordinary characters and minutes. If you love the series, you might have thought about how to draw Demon Slayer. We will tell you the best way to draw Tanjiro a truly cool posture and show you how you can vary in your creation. We will likewise go more than a couple of ways that you can add to the plan.
It will incorporate adding a foundation and different characters to the plan. All that is coming up in the aide before you, so prepare for some drawing fun! Moving along, how can you make your own Demon Slayer drawing? You can draw many more characters like Anubis drawing, coconut drawing, betta fish drawing, blueberry drawing, cobra drawing, bow and arrow drawing and more Cute drawing for kids.
Demon Slayer Drawing Step By Step
Step 1:
Regarding drawing individuals, even ones in animation or an anime style, the more powerful the representation, the more troublesome it will draw. You’ll see that this drawing of Demon Slayer is in a seriously unique posture, so it will be a precarious piece. Specialists will frequently separate a bringing into straightforward shapes utilizing a light pencil to design it, and you can do that too. The hardest piece of drawing an individual in any style is getting the extent right. You can assist with making this more straightforward by taking a gander at the last pictures of this aide and separating it into basic shapes, similar to an oval for the head and an adjusted square shape for the body, etc.
If you do this, attempt to press as softly as possible with the pencil to make it simple to delete later on. With everything expressed, we can draw the head for Demon Slayer now. His face is exact, with sharp segments at his jaw and jaw. You’ll see his hair is very conspicuous on his head; it’s stunning, wavy, and streaming in reverse to show that he is pushing ahead. If you utilize a shape to design out his head, a squat oval would be ideal, and you can isolate it into two segments, the face, and the hair. Since we have his head drawn, we can zero in on adding his facial elements in the subsequent stage.
Step 2:
Regarding manga and anime characters, they frequently have rather straightforward facial highlights. The highlights of this character’s face are more nitty gritty than some, be that as it may. Yet again, you can get ready for these facial highlights by arranging them first. Something else artisans will, in some cases, do is draw a cross across the state of the face. You can do this with two somewhat bent lines crossing each other. The upward line ought to be down the focal point of the face. You can situate it so the nose will go on this line when we draw it. So for this situation, the upward line should be more to the right-hand side of the face.
The flat line will go where the eyes will be drawn. When you have these lines, fire develops the face with essential lines and shapes to ensure you know where they will be. Make sure to either utilize an exceptionally light pencil or super delicately press the pencil down on the page. Presently we can draw genuine facial subtleties. His eyes are huge and more adjusted than some other anime characters. His nose and mouth are minuscule and drawn for certain straightforward, little lines.
This character likewise has a trademark checking on the upper right of his face, so you can add that in this step too, and it is drawn utilizing a few worn-out lines. At long last, he has a few enormous rectangular studs on his ears that have some decent itemizing on them too. Presently his head is finished; we can begin adding his body in the following stage of the aide.
Step 3:
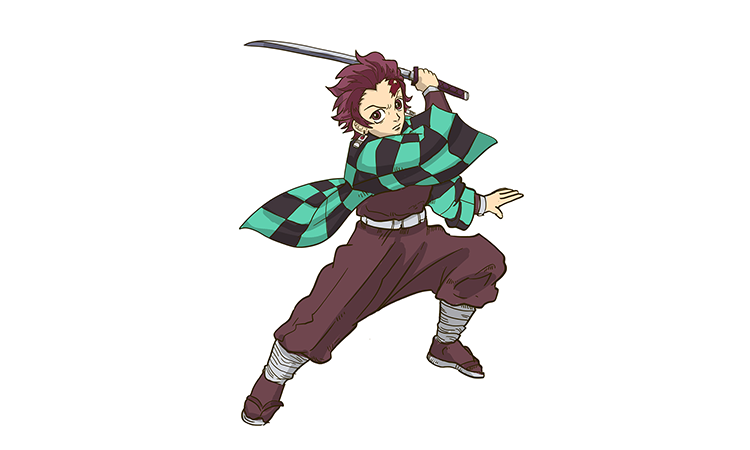
Tanjiro is wearing a flowy coat in this image, which we will draw in this step. He is also swinging his blade here, so we will also depict this. These stances are made a ton more straightforward when planning them out first. Since his coat is so flowy, it very well may be difficult to envision where his body is underneath the texture. Attempt to picture it as you draw; it is not difficult to get a piece lost with the presentation. We will draw a major rectangular sleeve for his right arm. It will have a genuinely enormous edge toward its finish. His shirt sleeve will jab out of the finish of this bigger coat sleeve, and it will be truly flimsy contrasted with the coat.
His hand will be toward the finish of this more slender sleeve. The sword configuration is very straightforward, made out of a flimsy rectangular handle on which he is getting a handle and the sharp edge itself. The edge has an extremely slight bend to it, yet it’s genuinely straight-edged all at once. As you can find in the reference picture, it will be behind his head with this posture, as he is busy swinging it. With the highest point of his body drawn, we can add the remainder of the blueprint in the following stage.
Step 4:
We can complete the framework for the body of this Demon Slayer drawing this fourth step of the aide. To begin with, we will draw the little segment of his shirt that we can see under his coat. It can be drawn for certain wavy lines and will be a little segment. Then, we will see his other arm jabbing out. This other arm will stretch out from the chest segment and have a comparably flowy coat sleeve and, afterward, a more slender shirt sleeve jabbing out from that. His hand will be stretched out in a straightforward posture toward the finish of his shirt sleeve. Then, we will draw his jeans.
We will situate his legs similarly to impact him in this mid-swing present. The leg on the left will be stretched straight, while the one on the right will be twisted. Similar to the coat, the jeans’ blueprint will be huge and flowy. The leg on the left will draw an adjusted rectangular shape, while the one on the right will be more adjusted. Then, at that point, we will add his boots to the legs. You might accept the boots would be drawn for certain straight lines, yet we will make them uneven and unpredictable. Once these are drawn, you can delete any of the pencil lines you might have drawn, as we will no longer require them.
Step 5:
More modest subtleties can truly assist with rejuvenating a drawing, and we will add a great deal in this fifth step. To begin with, we will add some sharp shapes inside the hair frame. You will see why we are adding these internal frameworks soon enough when we add the tones later. Then, add a line down the focal point of the sword edge. The handle of the sword has a precious stone example on it that you can add now too. His coat has a matrix design, and drawing it can be a piece precarious. It is because we need to represent how the texture is streaming. We suggest following the reference picture intently as you draw. Remember to add the framework to the arm jabbing out on the right. Then, add subtleties to the belt, like the clasp.
For his jeans, we will add heaps of bent, smooth lines to duplicate the vibe of the wrinkled texture. Lines across the top of his boots will also add some surface there. At last, add a few meager shapes by his toes to make them seem to be the foundation of his shoes are shoes. You’re prepared for the last step whenever you have added these subtleties! Before you go to the last step, add any subtleties you would like for the drawing. Adding a foundation to reproduce your Demon Slayer scene would be one smart thought to add to the drawing. If you have some other most loved characters from the series, adding them too could be enjoyable!
Step 6:
In this last step of our aid on the best way to draw Demon Slayer, we will zero in on the varieties to polish off the plan. His plan is fairly muffled, with maroon and green being the primary tones. There are a few nuances to the varieties, in any case. You will see this in his hair, so we drew a different segment inside the primary framework. The external part of his hair will be a lighter maroon, while the inward one will be a piece more obscure. This sort of nuance assists with making the person look more unique. We will then utilize a ruddy brown for most of his dress, including his shirt and jeans. Yet again, you can utilize different shades to conceal his dress uniquely.
Dark will be utilized for components like the sharp edge of his sword and his belt. His coat has a network on it, and the squares of this framework will shift back and forth between a dazzling green and a dull brown. With these varieties, you will have an exact portrayal of the person! While carrying variety to the drawing, attempt to involve the best craftsmanship vehicle for the gig. It is great to utilize craftsmanship mediums you’re OK with, however, go ahead and use ones that you’re less acquainted with, all things considered, as it may be amusing to explore.
Your Demon Slayer Drawing is finished!
The Demon Slayer series is so cool, and we want to believe that you lived it up, reproducing its principal character! This Demon Slayer drawing was positively difficult. However, that is the reason we needed to separate it. If you follow the means and plan it out with a pencil, you can make it a lot simpler. Assuming you’re truly battling, you can change the posture to one you see as simpler or work on the subtleties. Anyway, you draw it. Recall that there are more ways that you can mess around with the drawing. Adding a foundation or extra characters from the series can be an incredible method for making it much more customized.